Feeds:
Posts
Comments

Archive for the ‘cooking’ Category

That wasn’t the end of the barbie.

After the kids went to bed, I randomly googled a bit more about Australian food and read about damper. It’s a traditional Australian bread prepared by travellers as they went through the bush. The traditional recipe requires very few ingredients because the travellers would only have had basic rations with them on their long journeys. The basic ingredients are flour, water, and salt. As the camp fire died down, the damper was buried in the ashes of the fire and left there to cook.

I ran to check if the ashes from the barbie were still hot. They were!

Hurried to the kitchen. There was just enough flour.

20160411_222701

My unbaked damper

Quickly mixed the ingredients together, kneaded the dough, flattened it, and with tongs in hand went back to the mini-pit. I made a small depression in the ashes and put the dough straight onto the bed of ashes in the traditional way, then covered it with more ashes and the remaining hot coals. Actually you can also use a dutch oven to cook the bread in the fire, but I thought why not do it as traditionally as we can since we’re at it.

Buried under the ashes

Buried under the ashes

It did cross my mind whether it was healthy to have ashes sticking to the dough, but I figured that this was a traditional method that has stood the test of time, plus many cultures cook food in the ground. So I crossed that thought out.

I went to shower and do other things. In fact, I almost fell asleep!

As I was nodding off I suddenly remembered my damper and ran to retrieve it from the ashes. It was cooked through, and had a hollow sound when tapped. That’s the test to know if your damper is cooked. The centre bit was burned from being cooked too long though.

Burnt in the middle!

Burnt in the middle!

I left it to cool on a rack and headed to bed, eager to tell the boys about it the next day.

The boys were so surprised to learn that you could cook bread from the hot ashes of a barbie. They gamely tried the bread and loved it! We had it with honey, jam, and butter. I loved the smokey flavour of the bread. Pity that I had left it too long and the middle part was inedible.

We agreed that this was definitely something we want to make again, and that we should try it at the next barbeque. Apparently you can even cook it on a stick like how you cook marshmallows. Some travellers got tired of waiting for the bread to cook in the ashes, so they wrapped a bit of dough around a stick and cooked it over the fire. They’d then fill the hole that was left in the bread with jam or honey and pop the whole thing into their mouths. Sounds delicious!

Ellery came home telling me how he told everybody in school about damper, how he had promised to bring some for them, and how I had to make it again. So he woke me up at 645am in the morning to make damper for his friends.

There are many modern versions of damper that use more ingredients and bake the bread in the oven. We made a damper using milk, but deliberately decided to keep it as simple as possible because we wanted it to be authentic, so left out the butter and cheese, etc. Ellery was even skeptical about using milk because he really liked the plain, traditional version.

20160414_073116

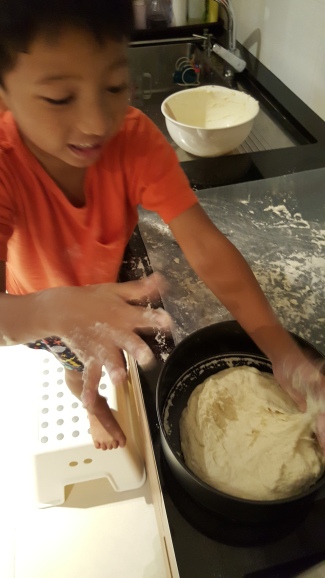
Shaping the dough into a ball

Pressing down the dough in the pan.

Pressing down the dough in the pan.

20160414_082727

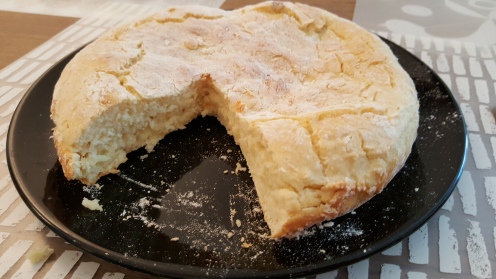
Oven-baked damper

This modern damper was still good, and went well with butter and jam. Like a bushman’s scone I suppose! But the ash damper has an extra oomph that we all prefer.

I cut a hunk of bread for him to bring to school to share with his friends. You could see the look of satisfaction on his face at being able to share something he had baked himself :)


Recipes

Traditional Damper

2 cups self-raising flour
1/2 tsp of salt
2 cups of water

Mix everything together. It will be a bit runny at first. Turn the dough out onto a floured surface and knead for a bit. Not necessary to knead for a long time (I saw one video where the lady didn’t even knead it). Shape the dough into a ball then flatten it. Make imprints all over it with your fingers. Make a clearing in the ashes, put the flattened dough straight onto it, then cover it with more hot ashes. Cook for about 40 minutes.

*The updated version we did was to substitute milk for water. There are many other versions you can find online, including adding herbs. I thought rubbing in butter would make it too much like scones though, rather than bread.

This video shows how to put the dough into the ashes.


Nair Food Adventure

  1. The Beginning of Our Food Adventure
  2. Week 1 – Down Under: Barbie

Read Full Post »

First stop, Australia!

My first thought when we picked this country was, barbeques! Or barbies, as they are better known in Australia.

So we started off our food adventure with a little barbie in our balcony. Sounds like a nice idea right? I imagined us sitting around a barbeque, chit chatting, letting the kids turn the food on the grill. Lots of good, fire-side bonding.

Nope. It’s probably the last time I’m gonna have a barbie at home. I wouldn’t say I was going to burn the house down, no, not at all. But I think we did create a lot of smoke. Enough to make people downstairs think there was some kind of fire, possibly. I realised the culprits were the meats. The oils from the popping sausages, and the marinades from the chicken dripped onto the hot charcoals which resulted in a lot of smoke. I kept trying to fan it outwards, away from the house, but found that there was still a slight smoky smell lingering in the house after the barbie. We ended up hiding behind the balcony doors, while I quickly popped out into the balcony every now and then to turn the food on the grill. Not quite what I had in mind.

20160411_200145

Tucking into the food. We decided to sit by the balcony for dinner :)

But oh boy. The food was so good. And I think the kids must have been so hungry by the time the food was ready that they were full of praises for the food too. I was especially surprised to see Asher repeatedly asking for more sausages! He’s never really wanted to eat them in the first place, yet here he was happily tucking into them, telling me how yummy they were. Maybe it’s the type of sausage. Note to self, chipolata sausages go down well with the kids. They really were fabulous though! Sausages grilled over a fire win sausages cooked in a pan or toaster any day! And the pre-marinated chicken we bought tasted perfect. On offer too. Score!

The highlight was the pineapple though. I remember loving the grilled pineapples from the restaurant Brazil Churrasco, somewhere I haven’t gone to in more than a decade, and wanted the boys to try it. It was a hit. They couldn’t get enough of it! And it was a breeze to cook – no smoking!

20160411_200154

Balcony barbie. Waiting for the pineapples to be ready.

Overall, the barbie was a success. The kids continued to talk about the food right up till bedtime, saying we should have another barbeque again soon :)


Nair Food Adventure

  1. The Beginning of Our Food Adventure

Read Full Post »

Out of the blue during lunch one day, Asher came up with this idea.

“Mummy! How about we have food from a different country every week?”

That sparked off an interesting discussion about how to decide which country’s cuisine to try, how many meals per week, what else we can learn in the process. We both got really excited and couldn’t wait to share the idea with Ellery!

In the end we agreed to do this:

  • At least 3 meals per week from the selected country
  • We would choose the country by playing a game
  • We must take at least 2 big mouthfuls of food, no matter how yucky looking or sounding it might be

Ellery got on board very quickly and we couldn’t wait to start our game to choose where we’d be ‘travelling’ to for our meals.

We took our map, got a counter from one of the board games, and took a dice too. Starting from Singapore, the number on the dice would tell us how many countries we can hop. We assumed that we would travel by land, unless we reached a country that was by the ocean, then we could take a boat/plane to any other country with a coastline. We’d take turns and the player could move anywhere they wanted without interference from others.

It was really fun seeing how the kids discussed with each other where to go, and I thought I’d better limit the number of countries to just six for now. Just to be safe. Just in case I couldn’t keep up with it!

After we’d chosen the six countries, I started to wonder…hmm…how will I ever cook stuff from there? I’ve never even tried their food before!

Want to know where we go and what we’re eating? Stay tuned! :)

World map with spices and herbs (Pic: Getty)

(Source: www.mirror.co.uk)

Read Full Post »

The tarts disappeared so quickly! The boys would bring the container of tarts around and munch wherever they went. Jon and I kept taking a piece every time we walked past too. Before we knew it, there were none left!

So how? No choice but to make more!

We started at 830pm, and at midnight we were still making tarts! Gosh.

And for the first time, Jon helped us! I’ve never ever seen Jon help with baking before, so it was definitely a photoworthy moment.

The tarts continue to disappear. We intended to keep some tarts for our friends to try, but it looks like the jar will be empty by the time we meet them!

Round 2

Round 2

Smiley face!

Smiley face!

Jon helping with baking!!

Jon helping with baking!!

Father-son bonding :)

Father-son bonding :)

Read Full Post »

After last year’s successful pineapple tart baking session which yielded what is, purely in my opinion, the best pineapple tarts around, my Mum and aunts decided to assemble for a pineapple tart session this year too! I was already planning to bake them again this year anyway since I couldn’t bear the thought of eating any other pineapple tarts ;O)

It took a really really really long time to bake 3 batches. The tarts are not difficult to make, just time consuming. We joked that we can’t make a business of this because it’s just too much effort for too little money! After about 9 hours of work, we made only slightly over 300 tarts – enough to fill 7-9 containers. After deducting for costs and manpower, there’s really no point. BUT. For personal consumption, it’s so worth it.

We started from after lunch, and carried on till after dinner. It was a multi-generational effort. My grandaunt, mum, aunt, me, Asher and Ellery all at one point helped to make tarts. A fun day of bonding!

Mummy rolling out the dough

Mummy rolling out the dough

Tried to let Alyssa play with flour but...

Tried to let Alyssa play with flour but…

She ended up eating it so that was the end of that plan

She ended up eating it so that was the end of that plan

The neat tarts my mum and aunts made

The neat tarts my mum and aunts made

The messy tarts the kids made :)

The messy tarts the kids made :)

My mum even made a dragon for Ellery!

My mum even made a dragon for Ellery!

It was actually very crisp and yummy!

It was actually very crisp and yummy!

Baking with Por Por!

Baking with Por Por!

The underpaid workers

9hours later but still happy as tarts!

Read Full Post »

It almost went by without us singing him a birthday song!

There were grand plans. Ellery had been asking to go to the zoo for a long time, but for various reasons we didn’t get to go. There was Legoland, which we were supposed to bring the boys to as a combined treat, but that did not materialise after our move as we got so tied up with house things (rectifications and all that).

In the end, everything was kept simple.

On Christmas day itself we had a special breakfast of pancakes cooked at the table, just like at Slappy Cakes. The boys had loved it when we ate there and my aunt had so generously bought us a crepe maker last Christmas so that we could do that same thing at home. In the end we only used it for pancakes one year later! We had became addicted to crepes and often had those for breakfast instead :)

Home style slappy cakes!

Home style slappy cakes!

Christmas pancakes!

Christmas pancakes!

After breakfast we made logcakes for our neighbours as a way to say hello. The boys had fun delivering them, and we discovered a couple of neighbours celebrate Christmas in a big way. Some others we discovered were vegetarian and couldn’t accept our cake because we used eggs. Need to look for eggless cake recipes!

Sprinkling on the snow

Sprinkling on the snow

As always we were double booked for Christmas lunch, so we did house-hopping and lots of eating! Usually people at these two homes would greet Ellery a happy birthday, and at the first home we’d sing a birthday song. But somehow this year all that didn’t happen. Thankfully Ellery was patient and didn’t demand or expect anything.

Being cheeky in the car and not wanting to stay still for a picture :)

Being cheeky in the car and not wanting to stay still for a picture :)

Lounging in our friend's house

Lounging in our friend’s house

We left the second house in the late evening and went to Toys R Us so that the boys could choose their own presents. But Ellery fell asleep in the car! We thought he’d wake up in the noise of Toys R Us but he didn’t. We headed for dinner and tried to wake him but he was just too tired. We were joking about how we were celebrating a birthday without the birthday boy! But just as we were finishing our meal he woke up! Just in time to eat something and enjoy some dessert :)

Birthday boy sound asleep

Birthday boy sound asleep

Finally up!

Finally up and being squished

It was back to Toys R Us again, and Ellery chose a bow and arrow set because he had played with a set in one of the houses earlier in the day and loved it!

Home, bathed, bedtime story, in bed. Then Ellery said he wanted to have a birthday song and cake cutting. Throughout the day I had wanted to do it, but there just wasn’t the opportunity. So although it was already 10pm, we pulled out a logcake that we had saved for Ellery, decorated it and sang him a song.

He loved it! Especially when we found that one of the candles was a trick candle that kept lighting up again. The boys had such a good time trying to blow it out :) I think in the end the cake was quite covered in saliva…hmm…

I was really happy to see Ellery beaming :) A simple birthday song and cake at home can be so special :)

An over decorated cake haha!

An over decorated cake haha!

Happy Birthday!!

Happy Birthday!!

Blowing out the candles

Blowing out the candles

Finally blew out the trick candle!

Finally blew out the trick candle!

Cut cut cut

Cut cut cut

Brothers :)

Playful brothers

Loving brothers :)

Loving brothers

—————————————————————————————

My dear Ellery, you have certainly grown. You have leaned out and are starting to lose your baby fat. Many people say you look thinner.

You still say the funniest things, and I have a long list of quotes from you that are just hilarious :) I laugh out loud everytime I re-read them! I must save them for you so that you can read what you said as a little boy.

You continue to be independent minded and like doing things in your own way, which is a good thing, but that same quality also makes you rather stubborn and difficult to discipline. Oh, what fights we have had this year. I have had a tough time reminding myself to model kindness and gentleness for you this year. But you can also be extremely charming and loving. You spout sweet nothings at random moments, and that always warms my heart. Whenever you say, “Mummy, I love you soooo much!” I can’t help but squeeze you tight, kiss your head, and all irritations of the day are dissolved.

It’s been a tough year for you too. On the one hand, you’ve become a very sweet and loving older brother to Alyssa. You were so happy when Alyssa was born you ran through school yelling, “I’m a Kor Kor now!!!” You play with her, hug and kiss her (even with dirty hands and oily mouth). On the other hand, I think you unconsciously feel the reduction in attention given to you and have been very whiny since your sister arrived. I have heard that middle children either become very independent, or very whiny. I think you’ve gone the whiny route. I’m hoping it’s a phase, and I’m hoping it ends soon. I try to pull out special moments with you, but it’s tough. I hope you know Mummy is trying her very best.

A new challenge has appeared this year too. One that I was anxious would come, and it did. You were an early reader and many people said to you or within hearing how “clever” they thought you were, and they praised you a lot. Too much. At that time I was thinking to myself that they really should hold back on excessive praise because it might negatively affect Asher, and more so, it might negatively affect you. Now it appears that you are only keen to try things that are easy. Anything that you think you’ll not be good at you immediately say, before even trying, that you can’t do it. I really pray that this is also a phase that will pass quickly. I pray that we’ll be able to build up your confidence to try things that at first seem difficult, and that you’ll realise you actually can do many things if you put your mind to it. Also, that we don’t expect you to be super at everything, but that you at least give things your best effort.

Mummy hasn’t had much time and attention for you this year, unfortunately. Mummy has been very stretched, but I hope you know how much I love you, how special you are to me! You are so unique, and I love you deeply!


Read Full Post »

Shepherd’s Pie

Asher had pie in school one day, and the boys decided they wanted to make pies to eat at home.  Ellery wanted shepherd’s pie, while Asher wanted to recreate the “creamy chicken pie” he had in school.

First up, the shepherd’s pie!

It’s a fairly easy recipe, so it was quite simple to get the boys involved.  This was also one of the rare times I let the boys go near the stove.  It was quite a simple job of stirring ingredients in the pot, and there wasn’t going to be hot water splashing about, so I let them help out.

Frying the onions

Frying the onions

Stirring in the meat

Stirring in the meat

Assembling the pie

Assembling the pie

The result was yummy, and the boys ate heartily!  Plus, I get to fulfil my red meat quota.  Win-win all around!

Ready to tuck in!

Ready to tuck in!

Yum!

Yum!

Here’s the recipe I used:

Shepherd’s Pie

Ingredients:
550g minced beef
2 carrots diced
1 onion diced
2-3 cloves of garlic chopped finely
1-2 tbsp plain flour
1.5 cups of chicken stock
a dash of black sauce for colour (maybe 0.5 – 1 tsp)
salt & pepper to taste
1-2 tbsp olive oil

For the topping:
5-6 potatoes, boiled
cheese – as much as you please (we used about 1 cup of shredded cheese)
some milk
pepper to taste

Method:
1. Preheat the oven to 210 degrees celcius.

2. Make the potato topping.  Add a dash of milk to the boiled potatoes and mash together.  The milk is to help make the mashed potatoes smoother.  Add the cheese.  Then add more milk gradually to your desired consistency.  Spinkle some pepper to taste.  Done.

3. In a heavy based pot, heat the olive oil then add the garlic and fry until fragrant.  Add the onions and carrots and fry for  2-3 minutes until the onions soften a little, but not too much.  Add in the flour, give the mixture a stir, then add in the stock.  Bring the gravy to the boil then reduce the heat and simmer for about 3 minutes.

4. Add the meat, making sure to break up the large chunks.  If the sauce looks too watery for you, add a little more flour.  Add the black sauce to give the dish some colour.  Add salt & pepper to taste.

5. Spoon the meat filling into pie/casserole dishes, top with potatoes, and pop into the oven for about 25-30 minutes.

Read Full Post »

For the last few family birthday gatherings I’ve been baking the birthday cakes just for fun.  I like to bake, but it’s always too much cake to eat at home.  So occasions like this are perfect to share the cal…the goodness.  And generally the family are willing to try my experiments, however badly they may turn out haha.

Since we were going to have a full Chinese dinner, I decided something light and fruity would be good.  The berries this season are exceptionally sweet, so they were a natural choice.  Instead of a triple layer cake, I stuck to a two-layer cake.  And I searched for an alternative sponge cake recipe, because the one I used to use has been falling out of favour with me because I find it too sweet.  I also searched for a less-sweet frosting recipe because I really, really, don’t like sweet frosting.  I’m the kind that will sweep away all the icing on a cupcake because it’s usually just too cloyingly sweet.  It’s really wasted on me.

After some researching, I decided on a Victoria sponge recipe, and found a cooked frosting recipe to try.  I generally try to find recipes that aren’t too complicated and that do not need too many ingredients.  The Victoria sponge turned out pretty well, though I think I can still cut back on some sugar.  I added lemon to give it a zesty boost to complement the berries.  The frosting was also less-sweet than regular icing as promised, but again, I think I can cut back on the sugar.  Why are these things so sweet??  I added cinnamon to the recipe too as cinnamon and berries just go so well together.

My little helper grating the zest

My little helper grating the zest

Folding in the flour

Folding in the flour

Assembly was easy.  I wanted to do the ‘unfinished’ look, so cake, frosting, berries, cake, frosting, berries, and I was done!  And the best part, it looked so beautiful because of the berries!  I was very happy when everyone, including the service staff at the restaurant, thought we had bought the cake.  And it was no effort on my part really.  The prettiness of the berries just brought the cake to another level.

Berry cake

The cake tasted good after a heavy meal.  It was light as intended, not too sweet (though in my opinion still can be less sweet.  But I’m a savory person, really), and was pretty as ever.

Here’re the recipes I used, adapted from here and here.

Lemon Victoria Sponge Cake

Ingredients:
225g self-raising flour, sieved
225g butter, at room temperature
225g extra fine caster sugar
4 eggs
1 tsp baking powder
Zest of 1 lemon
Juice of 1 lemon

Method:
1. Preheat the oven to 180 degrees C
2. Cream butter and sugar together until smooth and fluffy
3. Add eggs and juice to the bowl and whisk some more
4. Fold in the flour, baking powder and lemon zest
5. Pour into 2 round tins
6. Bake in the oven until golden brown for 20-25 minutes
7. Cool on a wire rack before decorating

 
Less-Sweet Cinnamon Cooked Frosting

Ingredients:
1 cup milk
3 tbsp corn starch
200g caster sugar
100g unsalted butter*
100g vegetable shortening*
1/4 tsp salt
1 tsp vanilla extract
2-4 tsp ground cinnamon (depending on how strong you like it to be)

* You can use all butter for more flavour, or more shortening for more stiffness (good for warm weather).  I did 50/50 to get the best of both worlds.

Method:
1. In a saucepan, mix the milk and cornstarch and heat while stirring until the mixture thickens into a paste-like consistency.  Cool to room temperature.
2.  Cream the sugar, butter and salt together.  Add the vanilla, cinnamon and cooled milk paste then beat until the mixture is smooth and light.  The frosting is ready for use!

Read Full Post »

Again, I’m so grateful for variety in Singapore, which makes keeping up the red meat intake so much more fun.  We had a fabulous beef burrito and chimichanga (fried burrito) at Margarita’s at Dempsey for lunch one day.  I love, love, love Mexican food and always have a problem choosing from the menu.  There are just too many yummy things to pick from!  As always, the food was comforting and bursting with a mix of flavours, and I was extremely satisfied with my meal.

Beef burrito

Beef burrito

Beef chimichanga

Beef chimichanga generously stuffed

As for my other meals, when I’m not eating out I usually just do a simple beef dish at home.  The burger was an indulgence though!  Mmmm.  Homemade burger patties are the best.  My grandaunt was craving burgers, so we made a huge batch and went over for a burger party!

Beef stir-fry with capsicum and onions

Beef stir-fry with capsicum and onions

Pan fried beef slices with pasta

Pan fried beef slices with pasta

Homemade beef burger

Homemade beef burger with onions and cheese

One of my friends recently asked me whether it’s boring to have to eat red meat everyday.  And my answer was, no!  There really is a huge variety of ways to consume it.  Vive la variété!

Read Full Post »

There’s a nice man who works at one of the food outlets near the kid’s school who has bought us breakfast on several occasions.  We decided to repay his kindness by baking him a cake!

We saw a recipe for a lemon yoghurt cake in one of the children’s books and decided this would be the cake we’d make.  It’s a really easy recipe and I like that you don’t have to deal with butter.  Most cake recipes start with creaming the sugar and butter, which can get quite messy with kids, even though I’m always fascinated at how it rises to become fluffy and whitish.  I also like that you use the yoghurt pot to measure out some of the ingredients.  It’s a lot easier for the kids.

We made two batches.  One for the nice uncle, and one with strawberries for ourselves.  It was quite iffy whether the strawberry version would turn out nicely since it was an improvisation, so we thought it best to not put strawberries in uncle’s cake as well.

I was really pleased to see Asher grate the lemon zest all by himself!  Had to remind him a few times initially to keep his fingers out of the way because skin was not part of the ingredient list, but after that he was good.

Stir stir stir

Stir stir stir

Mix Mix Mix

Mix Mix Mix

Pour pour pour

Pour pour pour

The cake turned out really well too!  The original recipe has a subtle lemon taste, while the one with strawberries has a lovely tartness to it.  Both are rich, dense cakes.  Yum!

Yum yum yum

Yum yum yum

Lemon (and Strawberry) Yoghurt Cake 

Ingredients:
1 pot of natural yoghurt
2 yoghurt pots full of caster sugar (we did 1 pot white, 1 pot brown)
3 eggs
3 yoghurt pots full of plain flour
2 tsp of baking powder
1/2 yoghurt pot full of oil
1 lemon
some butter
(optional) two cups of strawberries, sliced

Directions:
1.  Preheat the oven at 180 degrees Celsius.

2. Put the yoghurt in a mixing bowl.  Wash the pot and dry well.  You need the pot to measure the other ingredients.

3.  Add the sugar and eggs and whisk.  Then slowly add the flour, the baking powder, and finally the oil.

4. Wash the lemon.  Grate the peel.  Then squeeze the lemon.  Add the juice and zest to the mixing bowl.  Beat the mixture until all the liquids are soaked up.  If adding strawberries, now is the time to stir it in.

5.  Butter a baking tin.  Pour the contents of the bowl into the tin.  Bake for 30 minutes.  Leave to cool before taking out of the tin.

Read Full Post »

Older Posts »